| Page 4 |
|
|
|
|
|
|
|
|
Now that we've been through a bit about how the images are to be displayed, lets take a look at preparing the images themselves. You may have just seen the helicopter at the bottom of the previous page and wondered why the background was so bright. Well, that's because I like the contrasting colors when I'm trying to replace the real background from images. It's really not a good idea to leave a color like that in the final animation though, because there are still a few browsers out there that won't make a transparent background for an image . There are even some that won't play animations at all. For them you should keep in mind that they will only see the first image in your animation, without a transparent color. The Pause.gif that we inserted to delay the earlier animation example was also a bad idea being the first image in that sequence. I should have made Pause.gif the last image in that case. At least then the browser challenged would have been able to view something. If that image with the Pause.gif had also been a link, there would have been no way for any of the challenged to see it, much less use it. There's also the chance that people will be sending your works through the E-mail, again there are several services that are crippled in that they won't display a running animation. AOHells E-mail, and early versions of M$ Internet Explorer come to mind. I mentioned before that using a .jpg image to make animations is a bad plan. I should have qualified that statement just a little. You can begin with a .jpg, but your first Save-As should be in the .bmp format. The .jpgs problems don't really manifest themselves until you re-open the image. With that in mind, we'll get to playing. I'll start this by showing a fairly decent image captured using a scanner. This image is currently saved as a .jpg. 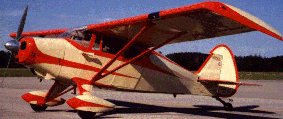 There are 23,931 colors in this image at this time, PSP will show you that. If your running your machine at less than 64,000 colors, this next change won't look much different to you. To the rest of us, it'll often look like a catrostrophy. It's time to find that 256color.pal file that you downloaded earlier. In PSP push the Colors button at the top of the screen, then click on Load palette. Browse to your copy of 216colors.pal file and double click it.  I've seen images take it worse than that, but now the image is using the color safe palette. Notice most of the shading is gone now, and the image has a grainier look about it. This image is now using only 49 unique colors. That's not too bad if you were trying to make an image with crayons, but now we'll know how the image will look by almost all who view it. Now that we've got that out of the way it's time to use Save-As, make it a .bmp. Next go up to Colors again and drop the menu, click on Increase Color Depth, then 16 million. Again use Save. Now double click on one of the colored boxes on the right in PSP. Choose a color from the options on the left, a color that doesn't appear in your picture yet.  Again, I've chosen the bright green. If you have a color that
contrasts better with your image, by all means choose it instead.
Usually I begin using the brush tool  Use the Magnifying lens  Did you notice also how I went right through the prop here? I'd like this image not to have one, so I'll also use the smudge tool to drag some wing and spinner color over where the prop was.  If you get to worrying about how crude this all looks, just zoom out till the image is normal size and have a look.  When your finished running the background color all the way
around your image, "leak free" use the flood tool, There's an easy way to capture images from your computer screen that you may not be aware of. It's the Print Screen button on your keyboard. Rather than downloading an image it's often faster just to hit your Print Screen button, open PSP click Edit, click Paste as New image. Using the print screen functuon will paste your whole screen shot right into PSP. From there you can crop (cut off the edges) of the image and save it as any file type you want. Most of the still images of animations on my site were captures from running animations. When the sceen displays the frame you want to keep, just hit the button. The little pictures of buttons I've included here are from this method of capturing images. Often times there are programs that store images in strange formats that can't be opened in imaging programs. Print Screen will grab anything you can see.  The above image can be clicked to bring up the full 800 x 600
version. It's a big one at 248 kb, so don't click it unless you
have a minute or two for it to load. This small version was made by
using Print Screen, opening PSP, using the magnifying lens to
shrink the view, then hitting Print screen again. I then pasted as
New Image and cut out the small one for here. Print screen can be
very handy indeed. |
|
|
|
|
|
|
|
|